
We all know we shouldn't repeat ourselves – repetition is a waste of time and effort, right? Well that may be true some of the time, but repetition definitely has an important role to play when it comes to graphic design. This tutorial will show you how to repeat graphical elements in Illustrator using specific offsets or rotations. This technique is often called 'step and repeat', although in Illustrator it's simply called 'Transform Again'. The idea is to simultaneously create a copy of an element while applying a transformation (position, scale, rotation etc.) to that element. That duplication process can then be repeated with a single command.
Simple duplication
First, you'll need to draw an object. We'll begin with a simple circle, placed at the top left of the artboard.
Duplicate the circle
Make sure you are using the Selection tool (the black version). Hold down the Alt key. Note how the cursor changes, and now looks doubled. This indicates that you can now drag to make a copy of the circle.
*if you want to keep your duplicates aligned, the easiest way is to use Smart Guides. Alternatively, you can hold down the Shift key while dragging.
Repeat to create more duplicates
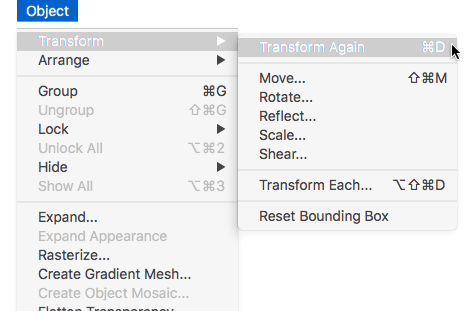
It's important at this stage that you don't click away from the circle. Keep it selected! Now hold down the cmnd/ctrl key and press D. This is the keyboard shortcut for the Transform Again command.
Repeat the Transform Again command using the keyboard shortcut for more circles.
Duplication using a specific offset
To specify the distance between copies, you simply use the Object, Transform, Move command.
Enter the required Horizontal or Vertical offset, or use Distance and Angle.
Select Preview to make sure your numbers work.
Click the Copy button.
Now you can create equally distributed duplicates using the Transform Again command as in the previous example.
Repeating Rotation
This technique lets you rotate multiple copies of an object around a common centre point.
This time, we'll need a large circle, and a smaller element that will rotate around it. I'm using a rounded rectangle, positioned at the top centre of the circle.
Set the axis of rotation
Select the object to be rotated, and press R or click on the Rotation tool.
You'll see a small blue marker in the centre of the object. This represents the centre point for rotation.
Reposition the marker by clicking in the centre of the large circle. Alternatively, you can drag the marker into position.
Rotate the object
Holding down Alt + the Shift key, drag the object around the circle until you see 45° in the indicator. Don't forget to let go of the mouse before you let go of the keys! The Shift key constrains the rotation to increments of 45°. Other increments are possible, but we'll cover that later on.
As before, you can now create duplicates by pressing cmnd/ctrl + D.
Learn more
There's much more to Adobe Illustrator than repetition. City Desktop Training offer comprehensive training courses that will teach you everything you need to know about this powerful software.
Check out our Illustrator courses for more information.